 Wordless Wednesday--and this one speaks a thousand words to me!
Linking to: Angry Julie Monday

 I sewed up this easy pillow project yesterday and I'm so pleased with how it turned out. No tutorial because this project is all over the internet, but it really is very simple. If you've never sewn a pillow cover before, Cottage Magpie has a simple step-by-step tutorial that I've used several times with great results. This was my first time adding in the piping around the edge of my pillow and I'm mostly satisfied with the results. I do have room for improvement for next time though! (And apparently I should have ironed the front of my pillow. Whoops!)
 I'm still deciding where to put it--I kind of like it here with my new ruffly pillows... At any rate, I'm really happy with the results!
 Last week I bought two of these great ruffled throw pillows at Costco for only $13 each! They're super soft and the fronts are covered in ruffles. They also had them in a gorgeous plum color, olive green, and one or two other colors. They were available in the square shape that I purchased as well as an oversized lumbar (rectangular) shape. I wanted the lumbar pillow, but they only had one left in the cream and the ruffles weren't looking too great on that one.
 Sorry for the picture quality, we've been having some overcast and gloomy days around here but I couldn't wait any longer to share these pillows. They are gorgeous!
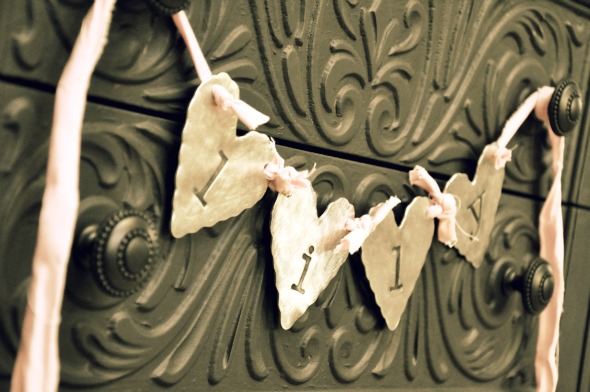 Lisa Leonard is one of my favorite jewelry designers. Actually, scratch that. She IS my favorite jewelry designer. I love her pieces and always have my eye on new items on her website. Currently she is introducing new decor items--and TODAY she is giving away an adorable pewter heart banner on her site. Click on over to enter!
 If you missed the heart banner giveaway on Wednesday, never fear! She is giving away oval wall hangings (your choice of engraved words) today, Thursday! Click here to enter!
 Look at this beauty I picked up for $4.99 at Goodwill awhile back! So springy and fresh--perfect for Easter!
 Ha, ha! Really I just liked the container--it reminds me of tin ceiling tiles.
 I quickly pulled off all the gnarly (never thought I'd use that word in a blog post!) faux flowers and revealed this anemic looking ball underneath. So much for using that for my sleek new topiary. It isn't exactly in scale with the base.
 So I wrestled it off--and a few of the extra twig things came off too. At this point I shoved the whole thing in a corner and left it...for over a year. I picked it all up again this weekend and it came together really quickly--and cleared some stuff out of my craft area (which was my goal).
 So, after my year+ long break, I took this styrofoam ball that I had in my craft supplies and jammed it onto the pointy stick that I had coming up out of my container. It went on pretty easily. I bought the faux boxwood garland a few weeks ago at Michaels Craft Store using a 40% off coupon and it cut apart very easily using regular scissors.
 I dipped each cut end of boxwood into some tacky glue before sticking it into the styrofoam because I didn't want my topiary falling apart and becoming a craft fail after all this time. This was working pretty well for me, except I didn't like the glimpses of white you could see through the boxwood.
 A quick an easy cure for the white styrofoam--paint it apple green! I got out my craft paint and one of my daughter's paint brushes and slapped a bunch of paint on my styrofoam ball. And by a bunch of paint I mean a bunch of paint. It went on easily but it sure did take a lot of paint. I probably should have used a green foam ball to begin with, but white was what I had.
 I love it--and totally wish I hadn't taken a YEAR off midway through the project.
 Right now I have it on my fireplace mantle, but I'm not sure where it will end up. I have some other plans for some Easter decor for my mantle, but for now this new topiary will do. Behind it you can see the wall decor I made with scrapbooking paper last spring.
 Boring builder heater vents. I've been staring at them for years and disliking them. We had new carpet installed in our house almost three years ago and put the same ugly heater vents back in place. There isn't anything wrong with them except that they hurt my eyes.
 I bought new iron heater vents and like them so much better! I even propped a scrap piece of the new white trim against the wall so I could imagine how everything will look together...and I like it!
 Happy St. Patrick's Day from my little leprechauns!
 subway art from eighteen-twentyfive
 Yesterday afternoon my little girl and I took some time and made a few small St. Patrick's Day gifts for her teacher and other key people at her school. I found a great tutorial for this project at Inspiring Creations and was able to find most of the supplies (except for the candy and little pots) in my stash of supplies here at home.
 I mostly followed the instructions listed on the original blog, except I used a lollipop stick to hold up the shamrock (because I have lots of them!) and I didn't bother to glue the floral foam into the little clay pots, I just wedged it in there. The shamrocks are hot-glued onto the lollipop sticks and my daughter wrote little messages on a second green shamrock that I hot-glued onto the back of the stick.
 Then we packaged everything up with a cellophane bag and tied with a gold ribbon and a cute tag (that I embellished with rub-on letters from my scrapbooking stash) and her little gifts are ready for St. Patrick's Day!
 Hello, electric blue faux marble counters and rubber ducky decor that I've now used in two homes (so for almost ten years now).
 Hello, Hollywood vanity lights and big plain mirror.
 Hello, oak cabinets. Yes, this is the bathroom that nobody but my children ever sees! I'm tired of cringing when I walk in there though and have had enough of that vivid counter--trust me, it is much brighter in person! The budget doesn't allow for a full-scale remodel, but a small-scale remodel is something that we can do!
 I was pleasantly surprised that the oak backsplash came off so cleanly. It was nailed on (and not caulked to the counter at all, thus providing no protection at all) and having it come off cleanly (without damaging the drywall) really opened up our counter options.
 Next my husband removed the sink and the counter. We were hoping to reuse the sink (for budget reasons) but he accidentally chipped the sink during this step. Whoops!
 Next it was off to Home Depot to buy a piece of stock laminate counter. Remember, we're working on a tiny budget in a children's bathroom that NOBODY ever sees--no granite going in here! This was the best option we found. My husband cut it to size and hauled it upstairs...and we had a problem. Notice the front edge of the counter and the ugly oak trim around the door? Not going to work.
 Hooray! Cutting off the back of the counter worked! No more electric blue laminate and now the new counter doesn't overlap with the door frame. A win-win situation! Next my husband did boring (but essential) stuff like cut a sink hole and install the new sink and faucet. Meanwhile I was looking forward to the next project--framing out that big ol' plate glass mirror!
 We framed the mirror with simple MDF boards with straight cuts to match the interior window trim that is going up in our house--not that there are actually any windows in this bathroom... The MDF is held onto the mirror by Liquid Nails. I can tell you that we tried multiple ways to temporarily hold the boards in place while they dried (me standing there, painters tape, me standing there plus painters tape, me standing there plus lots and lots of painters tape...) but the absolute best way was putting these little wood blocks under the bottom edge of the mirror and the trim. No tape, no need for me to stand there. Otherwise everything kept sliding down the mirror.
 My husband was quite concerned about what the exposed edge of the mirror would look like. So if anyone else out there is concerned, here is what it looks like after it is painted. I simply painted the edge of the mirror as well as the trim. I think it looks fine as it is, but you could hide it even more if you filled it in. For me it isn't worth it because you only see this edge if you are getting out of the shower or if you stick your face against the wall. In other words, I really don't think anyone will be paying attention to the edge.
 Still a work in progress, but so much better!
 Speaking of so much better, look what is above the mirror now! No more Hollywood vanity lighting! Again, this light isn't my dream light fixture, but it is a vast improvement over what we had and it is just fine for our budget and for the children's bathroom. Compromise--in this case, I'm compromising with the budget!
 So far--new light, new trim on mirror, new sink, new faucet, new counter...
 Next up--paint the walls and ceiling, paint the vanity cabinet white, new shower curtain, new towels...and let's not forget getting rid of the oak towel bars and paper holder. (Can you tell that I'm not a fan of oak?)
 Pardon the lack of blog posts this week, but I have been consumed by my daughter's M&M science fair project--which unfortunately does not involve me consuming any M&M's!!
 My seven year old has put SO much time and effort into this project! She has counted, sorted, thought, written, erased, rewritten, and put hours and hours of work into her M&M project. Her school science fair is coming up soon and, based on the results of that science fair, some of the children will have the opportunity to represent the school at the state science and engineering fair. Princess is very self-motivated and wants to go to the state science and engineering fair.
 I'm doing my part and being a supportive mama--taking pictures, typing up her drafts, and tracking down the materials she needs.
 Really though, this project is hers and I'm thoroughly impressed with the amount of work she has put into it. She is the youngest child in her grade (because she skipped first grade) and her academic skills amaze me.
 Now her scientific report is written and we're working on the display board--and it is oh-so-cute!
 My sweet (squinty eyed!) girl made her First Reconciliation this past weekend and is thrilled to be one step closer to making her First Communion. She was the first child to make her confession and was so excited to use the confessional. She had the option of using the confessional with a visiting priest or sitting down face-to-face with the parish priest--who isn't our parish priest because she made her First Reconciliation in the parish where she goes to school rather than at our home parish. At any rate, she chose the confessional because she is fascinated by it. She didn't tell me what she confessed (and I didn't ask!) but she did inform me that her penance was to say one "Our Father".
 After she was done, she made her First Communion banner (which has her name at the bottom--I attempted to clone it out in PhotoShop, thus the odd shadowing!) She will be making her First Communion at our parish church (with our priest who baptized her) and then the following weekend will be walking at this church's First Communion celebration where her classmates will be making their First Communion.
 old family room and toy closet/play area
 old family room and toy closet/play area
 The little pink chair in the doorway is one I found in my old room at my mom's house. I think she bought it at Ikea fifteen years ago! I tossed a pillow on the floor as well as my children's Pillow Pets. (As an aside, I love having a "home" for these Pillow Pets! I'm big on toys having homes.)
 I put Golden Books in a basket on the floor and put picture books in the book sling shelf along the back of the closet. The only item I bought for this reading area is the book sling I purchased from Amazon (it is by KidKraft and I paid around $50) but there are different versions at multiple retailers. Just like the rain gutter book shelves I put up in my son's room, I think it is great to have bookshelves that allow children to see book covers.
 My children were so excited when I showed them their new reading area! They call it "The Book Nook" and love reading in there. It is a cozy space that they can make as snug as they wish. I love providing different areas for my children to read and this one definitely is proving to be a favorite of theirs.
 With the exception of our recently completed addition, our windows are original to our house and are 15+ years old. We have multiple breached and leaking panes and some of them are so leaky that we have moss growing inside in the tracks of our windows. Gross and not exactly energy efficient.
 We put up some blue painters tape to simulate the look of the grids we have on our other windows. Now I feel like I have a very patriotic view...and I'm still completely undecided on what I want to do with the window.


